[How To ??] How to capture scrolling screenshots on Android
One of the most useful features of the Galaxy S8 can be had on any
Android phone. I'm talking about 'Scroll capture', which allows you to
take longer, scrolling screenshots of a whole page. There are a ton of
apps which let you stitch together screenshots manually to make them
into one file, but that's tedious. Here's how to get the scrolling
screenshot feature on your Android without the hassle.
Introduced to Samsung users on the Note 5, and majorly improved upon
for the Galaxy S7, was a nifty feature called 'Capture more'. This
allowed you to take a single long screenshot of a page, from the top and
scrolling all the way to bottom, in one file. This feature is back in
the spotlight now, thanks to the Galaxy S8, under the new moniker 'Scroll capture'.
With the popularity of the Galaxy S8, and all the hype about its amazing features,
more people are wondering how to capture longer screenshots on their
Android phones. While it's not a feature baked into Android itself, that
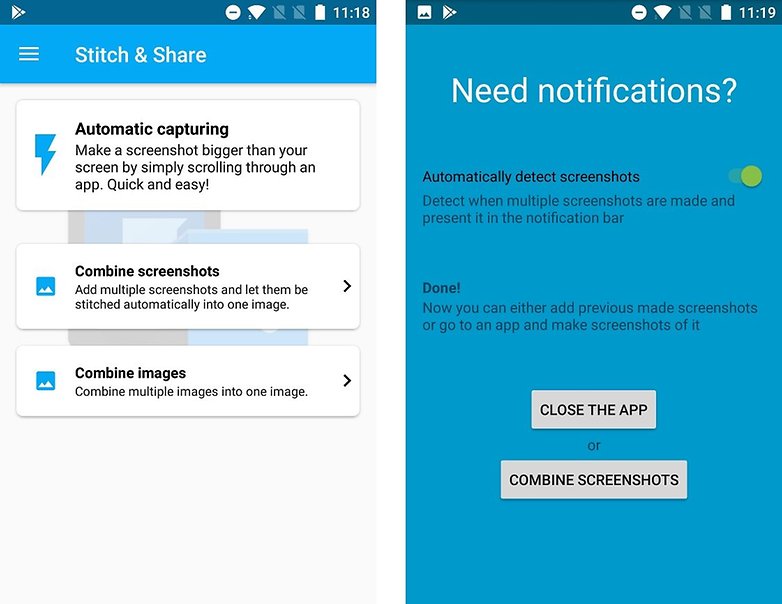
doesn't mean it can't be done. There's a third party app called Stitch & Share to save the day for those of you who don't have Galaxy phones.
This intuitive app allows you to take screenshots as you normally
would, then it stitches them together for you automatically (unlike
other apps which require you to do it manually). All you have to do is
save the screenshot as one file, and it even lets you share it from the
app right afterward.
You can capture a screenshot of an entire
website, news article or app with Stitch & Share from the Play
Store. Once you download it and grant it the required permissions, just
take your first screenshot as usual. Scroll down until only a small part
of what was visible in the first screenshot is still showing on your
screen, then take the next screenshot. Just repeat this step until
you've taken shots of everything you want. Then swipe down to open your
phone's notifications panel and tap the Stitch & Share notification
to open the app. Or, you can open the Stitch & Share app and select
the screenshots you want to be automatically stitched. From there,
simply tap the green arrow to save your long screenshot.
After a quick setup, you're ready to begin taking scrolling screenshots instantly.
To see an example of what Stitch & Share can do, take a
look at the very long, max resolution screenshot below. There are a
couple of drawbacks to the app, namely that the results aren't always
perfect, and a small watermark will appear on the bottom right unless
you upgrade to a paid version. That being said, it's a very convenient
and useful app.
We’re starting to see more and more people getting their hands on the new Samsung Galaxy Note 8, so for those of you looking for some help in rooting your device, XDA Recognized Developer dr.ketan has made a simple step-by-step guide for you. This guide will walk you through how to gain root access to the device using SuperSU . The developer also promises to provide an EFS backup tool so you can save the important data in this partition. Once your device is rooted, you open up the device to some interesting modifications such as flashing the popular audio mod called Viper4Android . Of course, there are already a ton of things you can do without root on Samsung devices such as blocking ads and disabling bloatware, but having root access is an added benefit nonetheless. Check out this guide in Galaxy Note 8 forum
Duo's picture-in-picture mode is now available for everyone on Oreo. Oreo introduced picture-in-picture mode for phones and tablets, and Google is now flipping the switch for Duo. The feature is now available on all Oreo devices. You don't need to make any changes to enable picture-in-picture mode. As long as you're using a device running Oreo and have the latest update installed , you should be able to use the feature. With picture-in-picture mode, you get a miniature version of the picture window in one corner of the screen when you hit the home button in the middle of a call. You can move the position of the picture window to any corner of the screen, and the video orientation will change automatically based on whether the phone is in landscape or portrait mode. Available now on Android Oreo! https://t.co/lYr30syCRV — Justin Uberti (@juberti) October 5, 2017
In teardown of version 7.12 of the Google app last week, we spotted several mentions of a customizable “Google Bar.” Since then, we have been able to activate the feature to reveal that future versions of the Google app that may allow users to customize the search bar widget. The latest Google app beta contains several strings referring to a “Google Bar” and the ability to alter its appearance: <string name=”google_bar”>Google Bar</string> <string name=”bar_color_title”>Bar color</string> <string name=”bar_logo_title”>Bar logo</string> <string name=”bar_shading_title”>Bar shading</string> <string name=”bar_shape_title”>Bar shape</string> Once rolled out, the new widget has an overflow icon at the very right that contains two menu items: “Customize” or “Send Feedback.” Tapping the former launches an editor where the bar’s appearance can be changed: Bar logo : Users can either select the full Google logo ...


Comments
Post a Comment